Sampling Primer 101
Sampling Primer 101 by Mary Underwood
Full disclosure: I’m a sample junkie. There is nothing digital invented yet that equals touching fabric. One of the great joys of belonging to a guild or group that asks members to share their work via producing samples is when that package or envelope arrives full of little bits of fabric or yarns or dyed fabric. And what a great way to get to know someone. I may not remember your name, but I’m sure going to remember your swatch! I belong to several study groups and guilds that produce samples for members. The day a sample or set of samples arrives is always time to celebrate. Seeing what others make for us just gets the juices flowing.
For MLH samples, we rely on the gracious volunteers who sacrifice a day or two (or many more if sharing one loom among guild members) to weave a sample for the rest of us to enjoy. Over the past years, I’ve encouraged both guilds and individuals to jump in and share what they are doing. There IS value in this exercise: value in the actual swatches we make or receive, and value in the exercise of deciding what to share with others or in receiving what others are exploring.
I would never ask someone else to do what I am not also willing to do. This summer it finally popped into my consciousness that maybe I should share what I do that makes it not a big deal to create samples for a large group of people. So, let me share my wishes and my secrets.
Samples that you want to keep:
1. Create a sample that will look good in 20 or 30 years. Maybe you aren’t into history and maybe you aren’t all that interested in little bits of fabric. Now. What about later? Can you be certain you aren’t going to buy a house of a particular vintage and find yourself interested in textiles from that time period? Can you be sure that a newbie in the world of weaving wouldn’t just die for a notebook of swatches to learn from? Can you be sure that sometime in the future someone might pay a big chunk of change for a complete set of a guild’s samples? Ask me about collecting all the Robin & Russ fabric swatches for my library!
Because our MLH swatches can be of tremendous value to you or someone else, I ask that they be finished in a way that will preserve them and allow them to look their best. Yellowed Scotch tape or masking tape creating a border, or badly serged edges with an offensive thread color can be maddening when you find old treasures. For that reason I ask that our swatch weavers use an archival glue to secure edges or send fabrics to me to cut and finish. Fulled wool often needs nothing at all to hold together.
2. Give a little information about yourself, your guild, the process of choosing the sample you weave, or even the history of the weave structure and what you’ve done or hope to do with it. This is a wonderful way for all of us to connect and get to know one another. Perhaps you or your guild can be a mentor to someone else. Maybe your samples are an invitation for others to explore your guild and what you are all about. It’s a major ice breaker when we all converge at our state conferences. We, of all creators, get to know things through our visual and tactile senses. What a great calling card! What you share with us, along with your sample and draft, is what gives the swatch depth and a presence.
Tips that make sampling easy:
1. Planning a project. What floats your boat? Is there a structure or color scheme that you love and want to share? Is there something you’ve wanted to try, but haven’t had time? Did you just take a workshop and learn some amazing weave structure or technique? Start there. Share your passion with the rest of us.
2. Executing the samples.
- At the start of September, MLH members all pay our dues. From this, we get the number of MLH members. But we wait until January 1 to give everyone lots of time to get those dues in. January 1st I get the numbers and will pass that along to you. We have individual members and guild members. That is added up and I give our swatch makers the number of samples to weave.
How do you determine your warp length and width?
- What are you weaving, and what yarn are you using? You want each sample to show an entire pattern or enough that the pattern is obvious.
- If using 60/2 silk at 80 ends per inch weaving a 4” swatch is maybe a bit too ambitious. You could weave a 1 x 1” swatch and we’d all be fine with this if it shows what you want us to see. If you are using 10/2 yarn, a 3” or 4” square isn’t unreasonable. Nothing over 4 inches if possible. We need to fit these in an envelope.
- Decide the trade off you are willing to make: a long time winding warp and threading to get a wide warp and less actual weaving; or a narrow web and weaving lots more. Or a warp that you want to continue with for a project. No rule on this one.
- Once you know how wide you want your warp to be, then calculate how many inches wide to make each swatch. And how long should it be? If you have, say, 6 swatches at 4” on a 24” wide row and each swatch length at 3 inches, you can get 72 swatches per yard. Remember to account for draw in and shrinkage. It’s all relative to what you are doing. I don’t have a set formula. And math frightens me. So I make this as simple as I can. This method works well for me. I always allow a minimum of 2 or 3 extra swatch rows to allow for screw ups.
- One really important thing is to make all swatches the same size so all our envelopes weigh the same.
How to weave samples easily and efficiently.
- Divide your warp into equal amounts of the width you predetermined. Do this when you design the warp. Once it is beamed and through the reed, divide it into sections of the predetermined width. Make however many lengths of yarn of contrasting color to visually divide up your warp into the number of swatches per row. Thread each length of yarn through an existing heddle and through the reed, attaching each to either the header or threads where you have tied on.
- Wrap the remainder of each yarn around something to hang off of the back of the loom. I prefer using empty or near empty cones. The cardboard ones are better for gripping the yarn than plastic ones. Secure the wrapped warp yarn by placing a like sized cone over the one you’ve wrapped in yarn. The weight of the two (or three) cones is sufficient to create enough tension to weave. It’s easy to remove the outer cone to quickly unwind the warp yarn as you go. Anything can work as a weight.
- When weaving, use a pick of contrasting color to separate each row.
- Simply keep track of each row you weave. Multiply the number of swatches in each row times the number rows woven until you have the target number. Or measure the finished amount and mark it on a long piece of cloth tape.
- If you wound enough yarn to make several projects after you finish sampling, just cut off the ‘divider’ yarns and continue weaving.
- When you have completed your weaving, wash the sample as you would like it to be. Press the woven web to your liking. In other words, finish your cloth as you want it to be.
- Create a draft and notes about your yarns, sett, inspiration or references, and anything relevant to creating this weaving that we should know. Please also give us information about you and/or your guild, your interests, and the inspiration for and use of your fabric. Any weaving notes would also be appreciated. Those who receive your generous donation want to know as much as we can about all of this.
- Life is easier for me if you send me an electronic file of your draft and write up plus a hard copy. If you don’t have a computer draft program, I’m happy to make that for you.
How samples are secured and finished.
- Easiest: Just send the fabric to me. If you’ve used colored threads to divide all the swatches, my job is simple.
- If your swatch is wool and is fulled, it is probably secure enough to just cut into squares. If not wool, the threads need to be secured to avoid unraveling.
- There is an archival glue that can be mixed with water to apply to edges. You can find it at stores like Michaels. But you can also use Elmers glue. It is of archival quality and not expensive.
- Mix Elmers and water – approximately 50/50 or 40/60 glue to water. It’s like grandma’s cooking. Just add until it feels right. You need enough glue to keep the mixture from dripping as you apply it. I keep chopsticks around from eating out just for this purpose. They make great stirs. Too thick and it’s overkill and doesn’t dry. Too thin and the mixture drips all over everything and doesn’t hold. Just play until you get it right. Make notes. Before applying to your whole woven yardage, check first to be sure there isn’t any bleeding of dyes.
- Prepare a surface that won’t be damaged with moist glue. I use a synthetic quilt cutting mat and lay newspapers over the top of that.
- Use a house painting brush to apply glue to the edges of each swatch. A foam brush with beveled edges works great. This is quick work if you leave the fabric intact and just apply the glue mixture along the colored dividing threads.
- Paint the swatch borders of as much of the fabric as you can. Cover the brush and glue/water mixture while you wait until the fabric is dry enough to move it off of your gluing surface. Begin doing the next grouping of swatches. Let the fabric dry thoroughly before cutting into swatches.
- I put cut swatches on newspaper and to keep them from sticking to the paper after I apply glue around the edges. I lift them all off of the paper after about 15 – 20 minutes and then have little or no problems with them sticking to the newspaper.
- In summer I like to do this process outside. A nice breeze helps the drying process. In winter, I just do the gluing with the fabric on the floor and let it rest there until dry.
- Once dry, cut apart with either scissors or cutting wheel. (I don’t use my best Gingher scissors on the glued lines!)
Sending things out.
- For MLH just put your whole web, or your glued and cut samples in a plastic zip lock or otherwise waterproof bag. And send them along. Do this at your convenience. Sooner is better. I need them by the end of May at the latest. USPS priority is a great way to go.
- For MLH mailings, samples are stapled or pinned to the draft/info sheet. Once you receive these you should really remove the staple and place the sample and draft in a clear plastic sleeve to put in a notebook. Leaving the staples or pins in invites a rusty mark years from now.
Reimbursement for yarn and postage.
Please send receipts to Mary Underwood at 1219 Traver Rd., Ann Arbor 48105 along with your samples. Let me know who to write it to. Or if using stash just write a little note with an estimate of the yarn cost. And if you are just glad to lighten up your closet and want to donate the yarn, we love that too. You will be reimbursed once all samples are in and ready to be sent out.
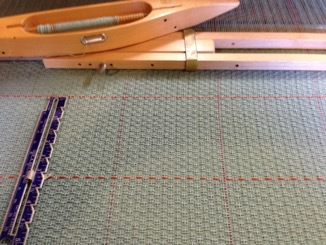 Contrasting warp and weft yarns as dividers
Samples for other guilds or study groups.
- For other groups you belong to you might want to just enclose your sample and draft in a plastic sleeve.
- Find out from the group coordinator the preferred way to exchange samples. One of my Complex Weaving groups prefers that samples/drafts are in plastic sleeves. Another group likes just the samples and paper drafts only, because the sleeves add significantly to the bulk and mailing price and are hard to keep in a pile. Every group has their own ‘thing’.
 Hanging supplemental warp yarn dividers off of the back beam
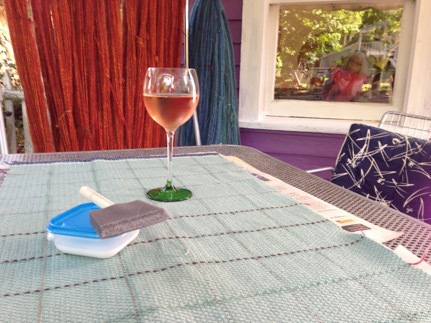
Chill some wine while you wash and dry your fabric. Kick back and have fun applying the glue/water along cutting lines. Invite your weaving friends over for wine and cheese and give yourself a pat on the back for doing such a great job and making the rest of us in MLH so happy.
Adobe Acrobat document [24.0 KB]